AI is pretty cool. It's also pretty dumb sometimes.
As it turns out, there are techniques you can use to make the AI less dumb.
Let's talk about how to make AI less dumb for your products.
The Problem with AI Hallucinations
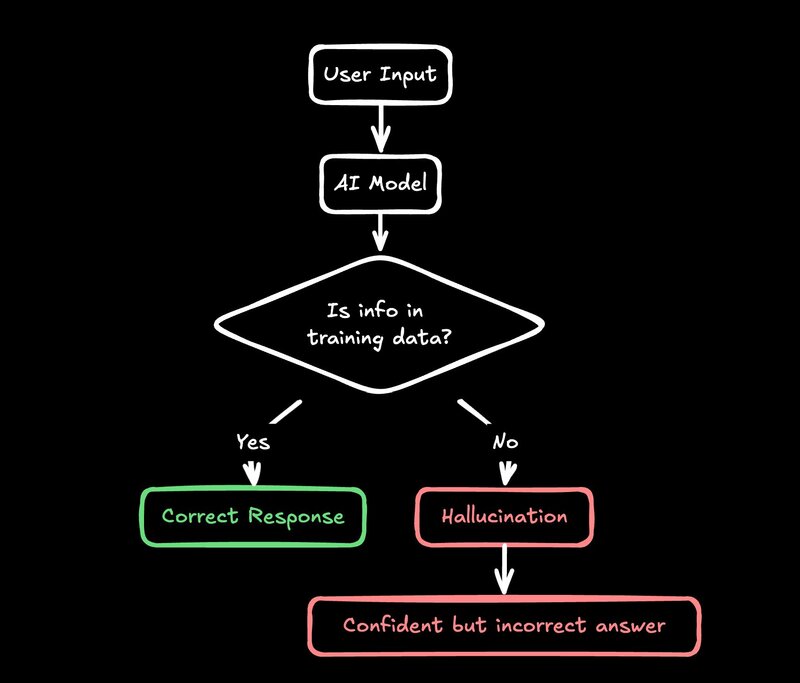
AI models, especially large language models (LLMs), have this annoying habit of making stuff up. We call it "hallucinating", which is a fancy way of saying "confidently bullshitting".
Here's why this happens: these models are trained on a ton of text from the internet. They learn to spit out human-like text, but they don't actually understand what they're saying. It's like that friend who always has an answer, even when they have no clue.
For example, when we first added AI to our docs, it would sometimes invent API endpoints that didn't exist. It would tell users with total confidence to "go to builder.io/api/user and send a POST request". Spoiler alert: that API never existed.
This isn't just a minor annoyance—it can lead to real problems. Imagine if a developer actually tried to use that non-existent API. They'd waste time, get frustrated, and probably end up cursing at their computer (and us). Not great for user experience.
The tricky part is that the AI sounds so confident. It doesn't say "I think" or "maybe". It just states things as facts. And when it's right, at best, 90% of the time, it's easy to trust it that other 10% - until it burns you.
How to Make AI Suck Less
1. Put AI in a Box
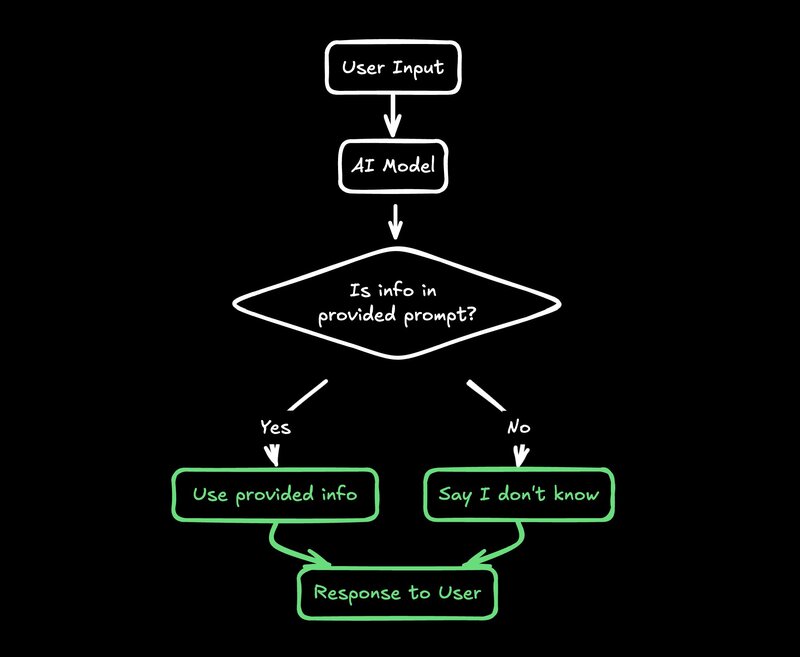
One trick that works well is to give the AI clear boundaries. It's like telling a toddler, "You can only play with these toys, and nothing else." Here's how we do it:
- Give the AI a specific set of information in the prompt.
- Tell it to only use that info when answering questions.
- If the info doesn't have the answer, tell it to say it doesn't know.
This approach cuts down on the AI's creative writing exercises and makes it more reliable. It's not perfect - the AI can still misunderstand or misapply the info you give it. But it's a huge improvement over letting it pull "facts" out of thin air.
We've used this for things like code simplification, summarization, and answering questions about our product. It works surprisingly well. The AI goes from being a know-it-all with a sketchy relationship with the truth to more of a helpful assistant that sticks to what it actually knows.
A good trick for doing this is using XML tags in the prompt and fetching relevant data to include, for example:
const docContent = await fetch('https://www.builder.io/c/docs/design-tokens').then(res => res.text())

const prompt = `
  You are an AI assistant with knowledge about Builder.io design tokens.

  Here is the information you know:
  <info>${docContent}</info>

  You only reply with information found in the above info. If you can't get your
  answer from there, say you don't know.
`
The use of XML tags in this case helps the AI know when a certain piece of content starts or ends.
One technique we use here is include a set of information from URLs, for instance:
const docs = [
  '/c/docs/design-tokens',
  ...
]

const allInfo = await Promise.all(
  docs.map(async doc => {
    return await fetch(`https://www.builder.io${doc}`).then(res => res.text())
  })
)

const prompt = `
  You are an AI assistant with knowledge about Builder.io.

  Here is the information you know:
  <info>${allInfo.join('\n')}</info>

  You only reply with information found in the above info. If you can't get your
  answer from there, say you don't know.
`
Look at that, we’ve implemented our own basic RAG (Retrieval Augmented Generation) system. You can extend this to not just include the same information per request, but include context-specific information as well, for instance in our docs widget we will pass in the current page the user is on, or in our Builder app we will pass in what currently is being edited and its relevant state.
This technique worked really well for our Builder.io docs assistant, which you can try in the bottom right corner of our docs. Compare that to Amazon's product review AI (called... Rufus?), which will teach you to code!
2. Be Crystal Clear with Instructions
The quality of what you get out of AI depends a lot on what you put in. Garbage in, garbage out, as they say. When we built our AI doc assistant, we had issues with it making up links or giving outdated info.
Our fix? We fed it our sitemap and told it, "Only use these links. Nothing else." Suddenly, our AI started behaving and linking to real, existing pages. It was like night and day.
But it's not just about giving the AI data. You need to be really specific about how you want that data used. We learned to write instructions for the AI like we were explaining something to a very literal-minded person. No assumptions, no implied steps. Everything spelled out.
// ❌ LLM is going to make up links that don't exist
const prompt = `Use links in responses`

// ✅ Be completely clear as to what links are avaiable to use
const prompt = `
When using links in responses, you are only allowed to use these links:
<links>${await getSitemap()}</links>
`
3. Let Users Talk Back
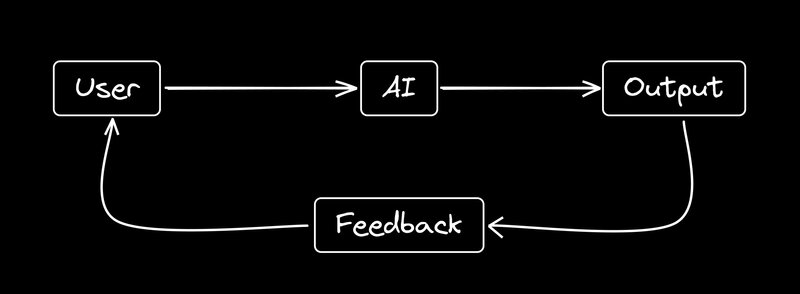
Even with our best efforts, AI will sometimes mess up. That's why we always use a chat interface for our AI features, even when the main use isn't chat.
This lets users say things like, "Oops, I forgot to mention I'm using Tailwind" or "There are too many components, can you simplify?" It's like having an intern you can correct on the fly.
The chat interface does a few important things:
- It gives users a way to provide more context or clarify their request.
- It allows for back-and-forth refinement of the AI's output.
- It sets the right expectations - this is a conversation, not a magic "always right" button.
We've found that users are more forgiving of AI mistakes when they can easily correct or guide the AI. It feels more like teamwork and less like fighting with a stubborn machine.
In our figma-to-code feature, this approach has been crucial. Web design is complex and nuanced. No AI is going to get it perfect every time. But by allowing users to guide the process - "Make that a flex container", "Use a darker shade of blue for contrast" - we can leverage the AI's speed while still giving users control over the final output.
In the above example, I give Visual Copilot feedback on how I want the output code to be structured. The chat interface is subtle, but essential.
4. Don't Let AI Do Everything
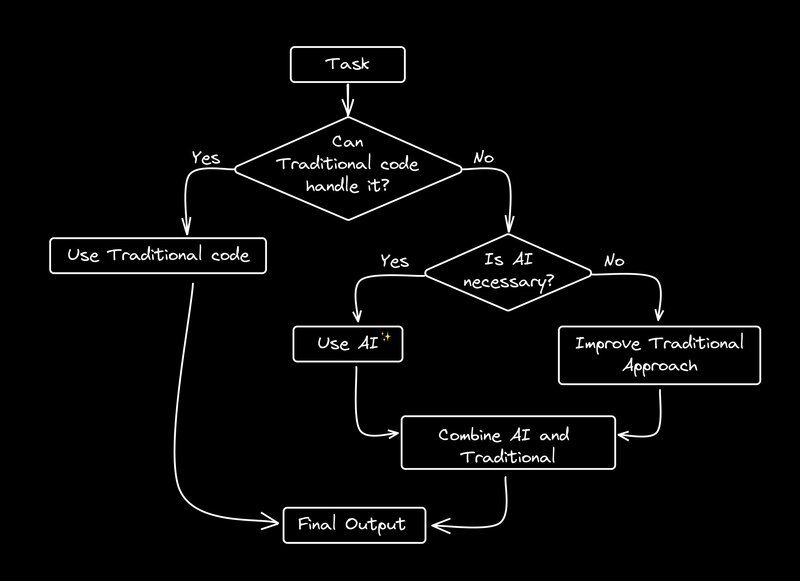
AI is cool, but it's not magic. We still need humans in the loop, especially for important stuff.
In our design-to-code workflow, we use a mix of regular code and AI. We start with non-AI methods to generate basic (but ugly) code. Then we use AI to clean it up. It's like having a messy designer and a tidy organizer work together.
This approach has a few benefits:
- It's faster. Traditional code can quickly handle the straightforward parts.
- It's more reliable. We know exactly what the base code will look like.
- It's easier to debug. If something goes wrong, we can pinpoint whether it was in the base code generation or the AI refinement.
We've found that AI shines in specific tasks, like naming things well, restructuring code for readability, or suggesting improvements. But for the core logic and structure? Good old-fashioned code is often still the way to go.
It's tempting to try to use AI for everything. But in our experience, the best results come from finding the right balance between traditional programming and AI assistance.
5. Give As Many Clear Examples As Possible
Sometimes AI is not the dumb one, you are.
A good litmus tests is to always ask yourself “If i gave these exact instructions to a human, with no other context, would they do exactly what I wanted every time the first time?”.
I bet more often than not the answer is no. Thats likely because your words come with a mental context that isn’t being explicitly spelled out.
So how do you provide the most helpful context as simply as possible?
The best solution, in my experience, is with examples. And this works the same with humans too - a lot of statements we as humans make are abstract nonsense until we provide examples. That’s why good writers and speakers use them so much, its not by accident.
For instance, in a recent project I was working on [see, an example is coming], I was telling the AI to give responses as JSON Patches:
// ❌ too ambiguous, likely to mess up
const prompt = `Respond using JSON patches`
The above prompt fragment performed poorly. When i changed to the below, it got wildly better:
// ✅ way more clear
const prompt = `
  Here are some examples of what the types of patches you could generate could look like, e.g. if this was the model:

  <example-model>
  { "name": "product-updates", "type": "data", "fields": [ { "name": "title", "type": "text", "helperText": "The title of the product update" }, { "name": "description", "type": "html", "helperText": "The description of the product update" } ] }
  </example-model>

  Note the format is JSON Patch (jsonpatch.com)

  to "update the type of the title field to be long text"
  { "op": "replace", "path": "/fields/0/type", "value": "longText" }

  to "add a new field called cook time"
  { "op": "add", "path": "/fields/2", "value": { "name": "cookTime", "type": "text", "helperText": "How long it takes to cook this recipe" } }

  to "remove the description field"
  { "op": "remove", "path": "/fields/1" }

  ... more examples
`
You might ask yourself with the above example: isn’t that what fine tuning is for?
Well do I have a good paper for you — tl;dr a few good examples in a prompt is (often) a better idea than fine tuning — not just for model performance, but especially for your ability to iterate and improve your results by quickly tweaking or personalizing examples via RAG.
The Micro Agent Approach
One interesting area of development in the field of AI is “agents”. Who wouldn’t want some AI robot to just do things for you end to end, right?
Well, as it turns out, that's the best way to let the small problems with AI compound quickly into disasters. But there are some interesting learnings we’ve had in this area recently.
We've been playing around with what we call a "micro agent" approach. It's like breaking a big problem into smaller pieces that specialized AI can handle.
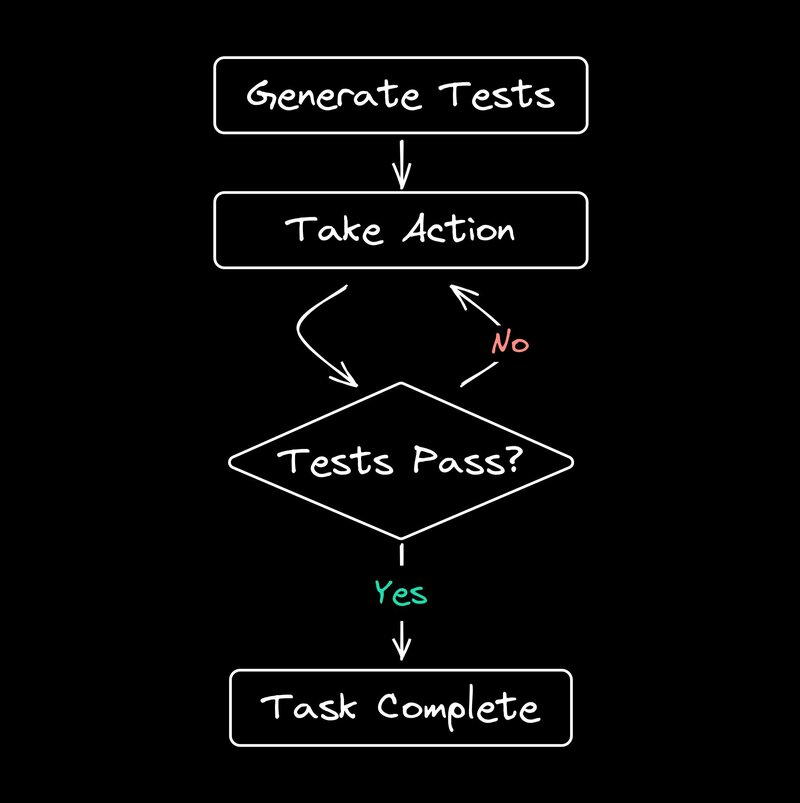
The key is to add non-AI checks between AI actions. For example, if the AI generates a link, we can check if that link actually exists before using it. If it's broken, we tell the AI to try again.
This approach lets us use AI for complex tasks while keeping things reliable. It's especially useful when you need to do a bunch of things in a row, as it stops small mistakes from snowballing into big ones.
Here's a simple example of how this might work:
- AI generates a code snippet
- Non-AI code checks if the snippet compiles
- If it doesn't compile, send an error message back to the AI
- AI tries to fix the code based on the error
- Repeat until the code compiles or we hit a maximum number of attempts
This back-and-forth between AI and traditional code allows us to leverage the creativity and flexibility of AI while maintaining the reliability and predictability of traditional programming.
We're still exploring this approach, but so far, it's showing a lot of promise. It allows us to tackle more complex problems with AI without sacrificing reliability.
Tips for Developers
If you're thinking about adding AI to your work or products, here are some tips:
- Start simple: Use tools like GitHub Copilot or Claude to get a feel for what AI can and can't do well. Don't dive into the deep end right away. Play around, experiment, and build an intuition for AI's strengths and weaknesses.
- Solve real problems: Don't add AI just because it's trendy. Look for actual problems it could help with. AI is a tool, not a magic solution. If you can solve a problem effectively without AI, that's often the better choice.
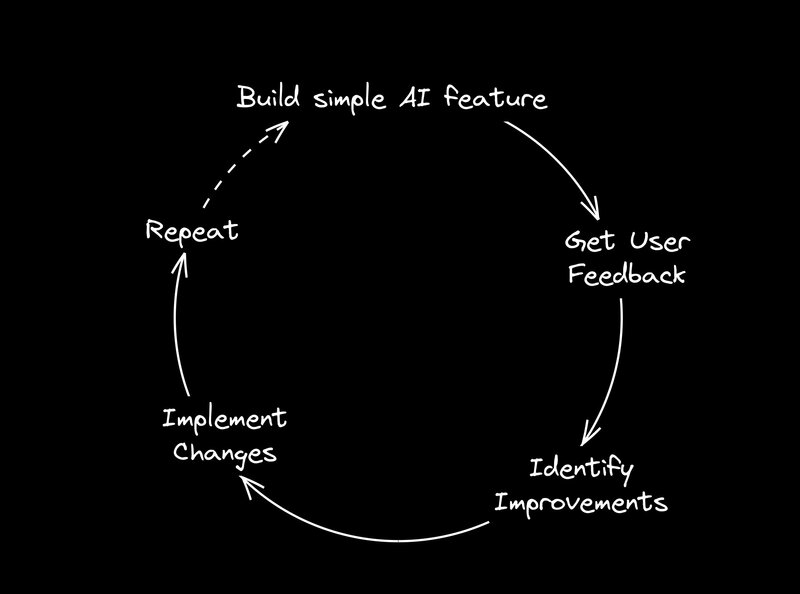
- Keep iterating: AI tech is moving fast. Be ready to experiment and adjust your AI features. What works today might be outdated in a few months. Stay curious and keep learning.
- Context is key: When working with LLMs, try to keep context across interactions. It helps the AI stay on topic. This might mean storing conversation history or relevant data and feeding it back to the AI with each request.
- Always have a plan B: No matter how good your AI feature is, always have a non-AI backup option. AI can fail in unexpected ways, and you don't want your entire product to break when it does.
- Understand the limitations: AI is not magic. It has specific strengths and weaknesses. Understanding these will help you design better AI-powered features and set realistic expectations for what AI can do.
Remember, integrating AI into your product is a journey. You'll make mistakes, learn a lot, and hopefully end up with something pretty cool. Don't be afraid to experiment, but always keep your users' needs at the forefront of your decisions.
Wrapping Up
Building reliable AI features is tricky, but it's doable. The key is to understand what AI is good at, what it sucks at, and how to work around its limitations.
By following these principles, we can create AI-powered products that actually solve problems instead of just being flashy demos. And isn't that the whole point?
About me
Hi, I'm Steve, the CEO of Builder.io. We make AI stuff, like a custom model that turns Figma designs into spankingly good code. You should try it out.
Introducing Visual Copilot: convert Figma designs to high quality code in a single click.


